
 How to Easily Create a Stunning WordPress Blog.
You will agree with me that as a content marketer, one of the best decisions you can ever make is to start a blog. That’s because starting a blog is the easiest way to build a platform in today’s world. Although you can do this with free hosted options like WordPress.com, TypePad.com, and Blogger.com, you will get the most control by using a self-hosted WordPress Blog. To do this, you will need to install a WordPress blog. This is what most serious bloggers use. It is what I use on my main blog – Astute Copy Blogging.
However, this is where many people get stuck. They assume that it is complicated and time-consuming to set up a hosting service and set up your WordPress blog.
It’s not.
How To Install A WordPress Blog In Less Than 15 Minutes: A Simple, Straightforward, Step-by-Step Process
In this Guide, I will show you how to install a WordPress blog in fifteen minutes or less. As a bonus, I explain how to write and publish your first blog post. If you don’t need this information yourself, perhaps you know someone who does. Please feel free to pass along the link to this post.
The good news is that you won’t need any technical expertise to setup your blog. This tutorial is simple. I walk you through the entire process, one click at a time.
As Easy As ABC: How To Install A WordPress Blog
You can install a WordPress blog by following these 5 easy, straightforward steps.
Preparation: Gather Your Resources
To install and set up a self-hosted WordPress blog, you will need:
- A domain name
- A credit card
- 10 – 15 minutes
It’s easier if you haven’t already registered your domain. It’s also cheaper. I will show you how to get one for free, using the service I recommend in Step #1.
However, if you have already registered your domain, no sweat. You will simply need to add an additional step. I will explain the process at the end of this post.
#1. How To Install A WordPress Blog – Step 1: Set Up a Hosting Account

This will be your blog’s home and where it will “live.” This is a server in the cloud (i.e., a remote computer), where you will rent space to install WordPress (the WordPress software) and manage your blog. It’s far easier than it sounds. Don’t go anywhere. Stay with me.
Special Discount For You 🙂
Bluehost is offering web hosting to readers of my blog for just $3.95/month. That’s 50% off their regular rate—and sometimes the discount is even greater!
Click here now »»»»»»» To Take Advantage of This AMAZING Offer!!!
There are a hundreds of hosting services available—perhaps thousands. However, based on my experience and research, I recommend Bluehost. I believe it is the best option for most people for the following seven reasons:
- Reason #1: Special Discount For You: Bluehost is offering web hosting to readers of my blog for just $3.95/month. That’s 50% off their regular rate—and sometimes the discount is even greater! Click here »»»»»»»»» to take advantage of this offer.
- Reason #2: Support. Bluehost has great 24–7 support via phone, e-mail, or chat. I have personally used it several times and found the support staff to be quick, courteous, and knowledgeable. All of the company’s support staff are located in the U.S.
- Reason #3: Reliability. Bluehost is super reliable. It boasts an uptime average of 99.9%. That’s about as good as it gets.
- Reason #4: Ease of Use. Bluehost is super easy-to-use. In fact, shockingly so. You’ll wonder why you haven’t set up a hosting service before now.
- Reason #5: WordPress. Interestingly, WordPress itself only officially recommends three hosting services. You will be delighted to know that Bluehost is number one. It hosts over 850,000 WordPress blogs!
- Reason #6: No Limits. Bluehost offers unlimited disk space, unlimited bandwidth, unlimited domains (i.e., you can host multiple blogs or sites on one account), and unlimited e-mail accounts.
- Reason #7: Values. In its Terms of Service (see Section 10.03, Bluehost prohibits pornography, nudity, and other adult content. It strictly enforces this standard and deletes sites that violate it. Personally, I don’t want my blog sitting on the same server as some pornographer. If you feel the same way, you may be surprised to know that almost all of the most popular hosting services allow pornography on their servers.
Note: I am a Bluehost affiliate, which means the company pays me a small commission every time someone signs up via one of my links. But this didn’t influence my recommendation, because all hosting services have similar programs. I recommend Bluehost because I honestly believe they offer the best hosting available.
By the way, Bluehost offers a thirty-day, money-back guarantee, which is written into their Terms of Service. So there’s really no risk on your part.
Okay, so if you are still with me, go to the Bluehost home page. Click on the Get Started Now button.
Now you need to decide on your plan. I want to suggest that you select the Plus Plan. This is Bluehost’s most popular option—and for good reason. It’s only two dollars more a month than the Basic plan, BUT it gives you the ability to host an unlimited number of websites on this one account. I think that makes it a no-brainer.

Regardless of the plan you pick, my instructions will work for you; the math will just be different. Continue by clicking on the Select button.
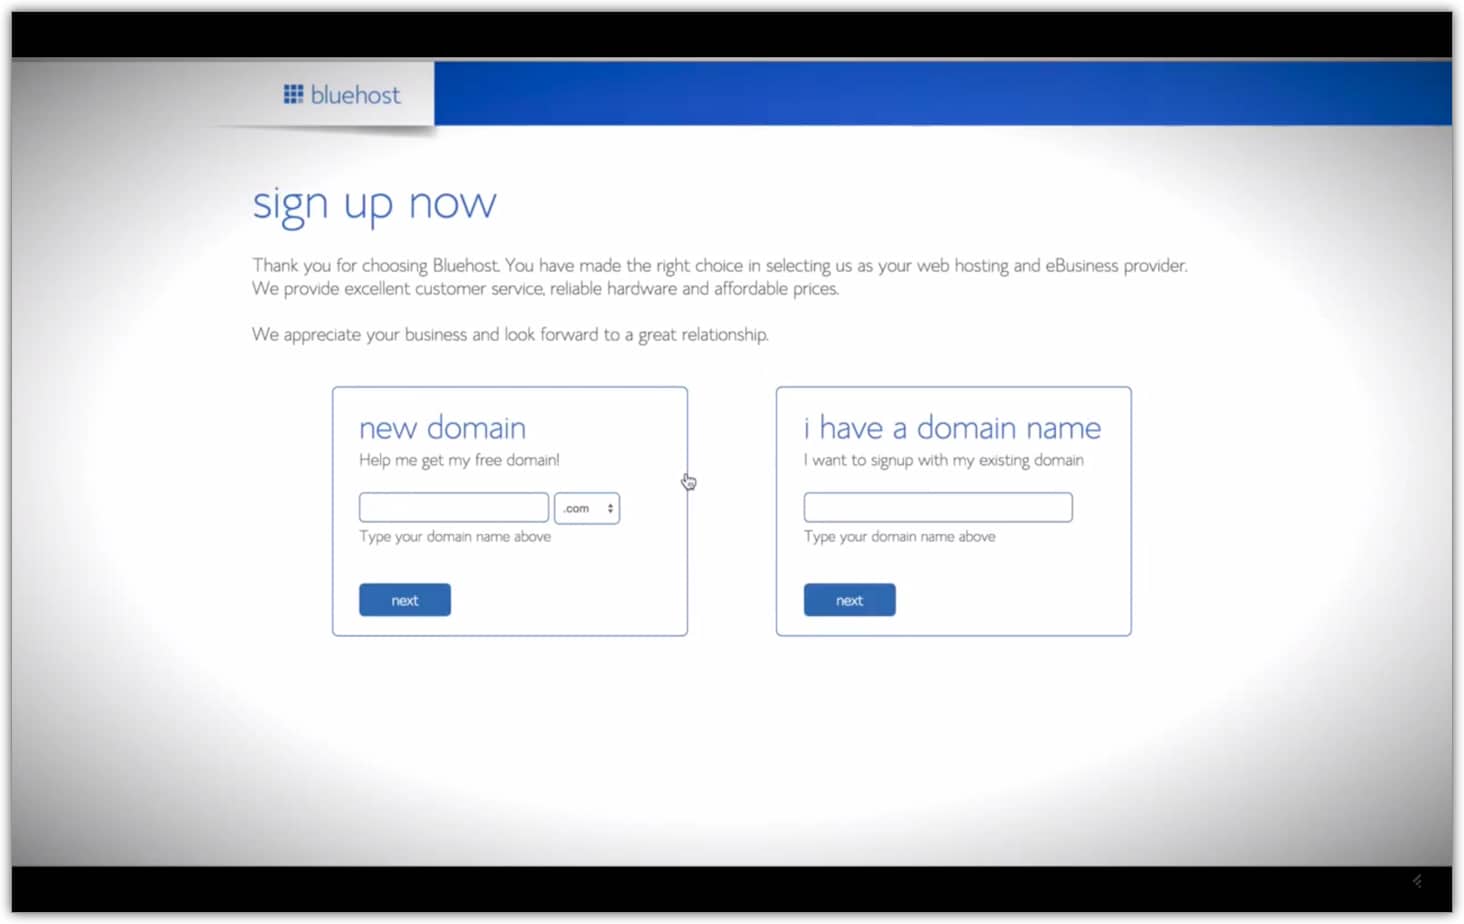
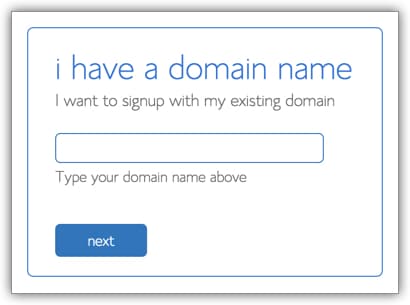
Now you need to decide whether you need a domain name or you already have a domain name. I’m going to assume that you haven’t previously registered a domain, using some other domain registration service (e.g., GoDaddy.com). If you have, I will explain what to do at the end of this post.
Now enter your domain name in the left-most box, choose the appropriate extension (com, net, biz, etc) and click on the Next button.
Fill in your account information and then scroll down to select your package. As you can see, the prices range from $5.95 to $7.95 per month. (Again, this is for the Plus Package.) It all depends on the length of your commitment.
One thing to keep in mind, is that you will be required to pay the annual rate upfront. That’s how Bluehost is able to offer these super low prices. Based on using my affiliate link, here’s the math:
- 12 months at $7.95 per month is $95.40 per year and $95.40 upfront.
- 24 months at $7.45 per month is $89.40 per year and $178.80 upfront.
- 36 months at $5.95 per month is $71.40 per year and $214.20 upfront.
- 60 months at $5.95 per month is $71.40 per year and $357.00 upfront.
I would suggest you add Domain Privacy Protection for $0.99 per month, which will add an additional $11.88 to your upfront payment. When you add Bluehost Domain Privacy to your registration, the only information listed in the Whois Information will be Bluehost. The whois information for any domain name is available to anyone on the internet. Your whois information can be harvested by marketing companies, which will give you unwanted solicitations. With domain privacy, you will still be the owner of the domain name, but your contact details will not be accessible through the whois information.
I would not sign up for any of the other services highlighted in red on this screen below, but that’s up to you.

Now enter your billing information. Confirm that you have read and agree with Bluehost’s Terms of Service, and then click on the Next button.

The system will now verify your credit card information.
Bluehost will next ask you to “Select the Upgrades that Best Suit Your Needs.” I would skip all of these. Click the Complete button at the bottom of the page. Be patient. This may take a minute or two.
You should now see the “Welcome to Bluehost” screen, along with a “Congratulations” message. Now you need to choose a password for your account. Click on the Create your password button:
Use the Password Generator option to create a strong, difficult-to-hack password. Copy this to the clipboard by pressing ⌘-C if you are on a Mac or Control-C if you are on a PC. Now click the Paste button to paste the password into the appropriate fields.
Now click the checkbook that says, “I confirm I have read and agree to the Terms of Service …” Then click the Create button. This creates your new Bluehost account.
Warning: You might get an error message here. It is simply because it sometimes takes a few minutes for the Bluehost robots to create your account. Don’t panic. Worst case scenario, call BlueHost Support at 1–888–401–4678.
This will bring you to the Bluehost login screen. Here you will be asked to login to your domain. Your domain should be automatically inserted for you. If it is not, type it into the field provided.
Now use the password you just selected in the password field. Since you previously copied it to the clipboard, you can paste it with ⌘-V on the Mac or Control-V on the PC. Now click on Submit.
You may see yet another upgrade offer, perhaps for Optimized hosting. Feel free to ignore this for now. You can always add it later. Instead, click on the Hosting link in the upper left-hand corner.
This will take you to the main Control Panel. You might get another pop-up. This one is offering to walk you through the process of setting up your website. You can close this screen by clicking on the X in the upper right-hand corner. I will walk you through this myself.
You should now be at the Control Panel, sometimes called the cPanel.
#2. How To Install A WordPress Blog – Step 2: Install WordPress
Don’t be intimidated by the number of buttons in this step—it’s amazingly simple. The process used to be complicated, and you had to be a semi-geek to pull it off. But Bluehost now makes it super-simple. Trust me, anyone can do this.
Scroll down the page to the “Website” section. Click on the Install WordPress logo and wait for the new page to load. Be patient. It might take a minute.
A new “WordPress” screen appears. Simply click on the Install button. That will bring you to a new screen. Now select the domain on which you want to install WordPress. It should default to the correct one. Click on Check Domain.
The next screen will say “Last step, you are almost there.” Click on “Advanced Options.” Type in your site name or title. (Don’t worry. You can always change this later.) Accept the “Admin Username” and “Admin Password” that Bluehost suggests.
Now click on the item that says, “I have read the terms and conditions of the GPLv2.” Now click on the Install Now button. The installation process should begin and will keep you updated on the process. Be patient, this will take a minute or two.
Bluehost might then offer you another upsell. (I realize this gets annoying. Hang in there. You are almost done.) Just close the pop-up if there is one. You can usually do so by clicking on the X in the upper right-hand corner of the pop-up.
You should now see a progress meter at the top of the screen. Again, this will take a minute or two, depending on how busy the Bluehost robots are. It will evetually say, “Your install is complete!”
Now click on the View Credentials button. This will take you to the Notification Center. Click on the View button.
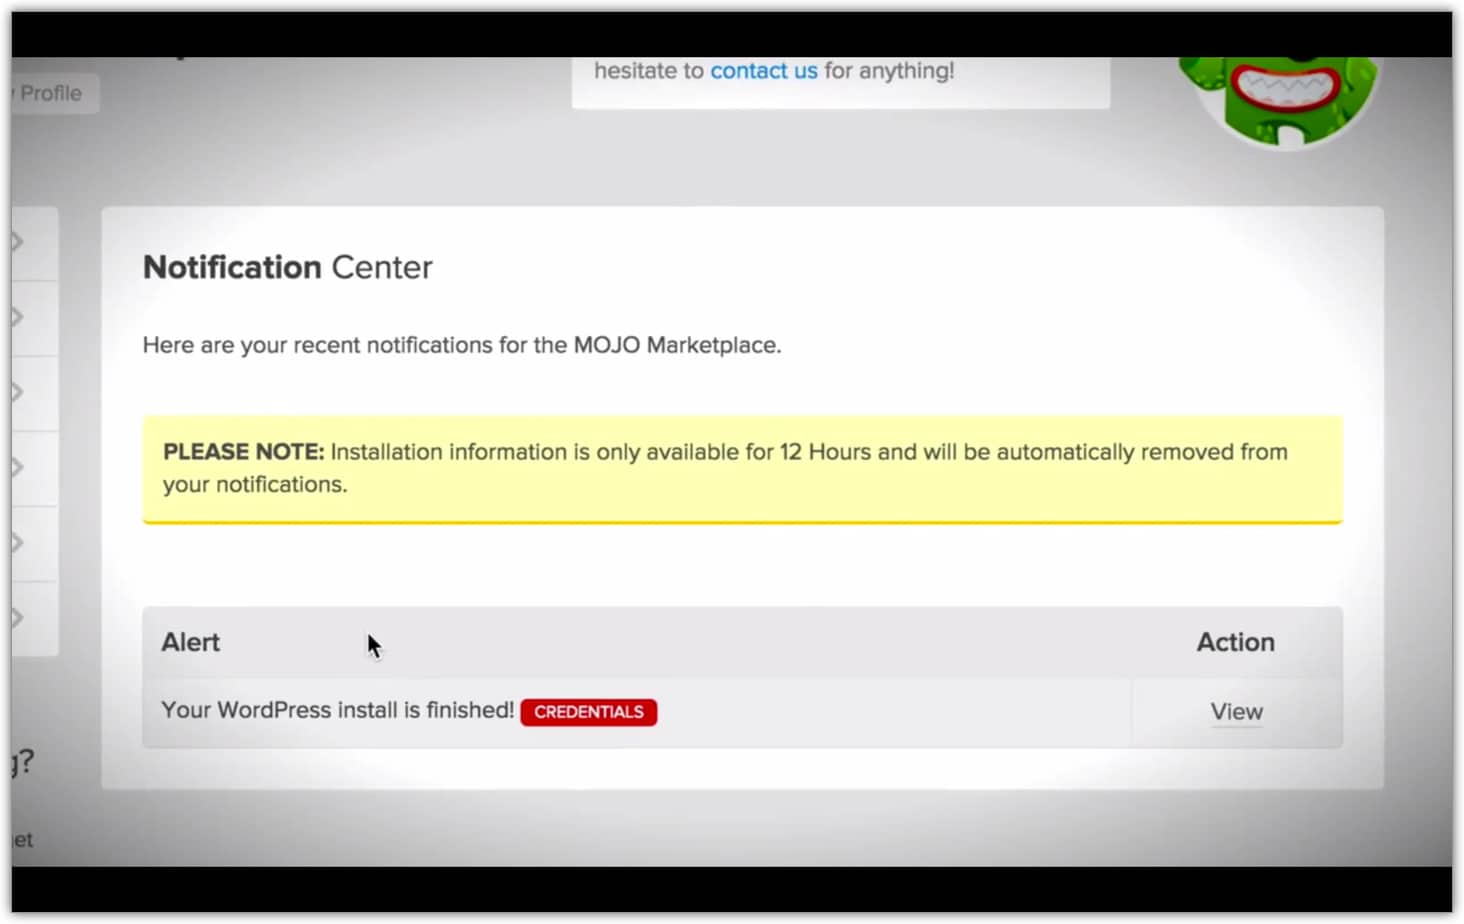
When it is done, you will get a screen with your Blog URL, Login URL, username, and password. Bluehost will also e-mail this information to you, but I like to have a backup. I would write it down or take a screenshot. Also, copy the password to the clipboard (again, using ⌘-c on a Mac or Control-C on a PC).
You’re making great progress! You have completed the most difficult part of the process. Now things will speed up considerably.
#3. How To Install A WordPress Blog – Step 3: Log into WordPress
Click on the “Admin URL” link. This will take you to the WordPress login page.

Now enter your username and password. (Remember, you wrote these down in Step 3. You also copied the password to the clipboard.) Click on the “Remember Me” checkbox and then click on the Log In button.
You should now be looking at the WordPress “Dashboard.” Sometimes, bloggers refer to this as the WordPress back-end. The front-end is what your readers see—your normal blog site. The back-end is what you see—how you control what appears on the front-end.

You might see a welcome screen or an offer for JetPack. Don’t worry about these now.
#4. How To Install A WordPress Blog – Step 4: Write Your First Post
Click on the Posts | Add New option in the left-hand side menu. You should now see the New Post screen.
Enter the title of your post, perhaps something like, “Welcome to My WordPress Blog!” (I know, brilliant, right?)
Now write your first post in the field directly below the title. Perhaps you could explain why you are starting your blog, the topics you plan to write about, and how often you intend to post. (Tip: under-promise and over-deliver.)
Now click the Publish button. This literally publishes your post for the world to see. You might see a message that says, “Your site is currently displaying a ‘Coming Soon’ page. Once you are ready to launch your site click here.” If so, click on the “click here” link.
Congratulations! You have just published your first post on your very own self-hosted WordPress blog.
#5. How To Install A WordPress Blog – Step 5: Load Your New Blog
Simply click on the “View Post” link. Your new blog should load in a new browser tab.
As you can see, there’s nothing very fancy here. WordPress uses a very generic theme by default. But that’s the beauty of WordPress. There are thousands of themes available. I will recommend one in a minute.
How To Install A WordPress Blog – Now Choose A Theme
The next step is to install a theme. There are literally thousands of free ones available.
Choose and install your theme. There are very many free themes you can use. Make sure your theme is mobile responsive because most people now access the web through their mobile devices.
Here are some free themes to consider:
Note: If you need to move an existing blog from WordPress.com to your new self-hosted WordPress blog, I recommend you read this article: “How to Properly Move Your Blog from WordPress.com to WordPress.org.”
How To Install A WordPress Blog – Learn More About WordPress
If you want to learn more about WordPress, I recommend WP101.com. This is a tutorial site with hundreds of videos on every aspect of WordPress.
If you know someone else who could benefit from this information, please pass along the link to this post. If you would like to embed the screencast in your own blog, please feel free to do so. You can find the video on YouTube.
Optional:
How To Install A WordPress Blog – If You Have Already Registered Your Domain
What if you have already registered your domain name on another service? No big deal. The first thing you will need to do is to point your domain name to the Bluehost servers. This will vary depending on where you registered it. Bluehost describes the process here.
Note: If you don’t already own a domain, then this Step is not needed. You can just skip to the bottom, or click here to get your Bluehost discount
For example, at GoDaddy, where I have some domains registered, you log in, then go to Domains | Domain Management screen.
Now click on the domain name you want to point to Bluehost. You should now be looking at the “Domain Details” page. Scroll down until you see a section called “Nameservers”.
Click on Set Nameservers. A new screen should pop-up.
- Enter ns1.Bluehost.com in the field for Nameserver 1.
- Enter ns2.Bluehost.com in the field for Nameserver 2.
Click OK. That’s it. Now log out. It typically takes 24–48 hours for these changes to take effect. You might get lucky, and it will start working in an hour or two.
Please note: Bluehost or your Registrar (the company from whom you bought your domain) may change their procedures from time to time. If you have any problems, please check with them. I do not provide technical support for this process.
Once you have done this, you can begin the process of setting up your WordPress blog. In Step #1, after you click Sign Up Now, you will need to enter your domain name in the right-most box that says, “I Have a Domain Name.”
Now click the next button. Everything else should be the same. If you get stuck, you may need to wait for the change in your Nameservers to take effect before proceeding. Be patient.
If you made it this far, congratulations! As you can see, it is super easy to Install A WordPress Blog.
Blogging Tips And Freebies
For more blogging tips, and free resources to help you on your blogging journey, please visit my main blog Astute Copy Blogging.
Pedro is a professional blogger, coach, copywriter and list grow strategist. He is the founder and CEO of Astute Copy Blogging. He helps entrepreneurs build large email lists that they can mobilize and monetize so that they can live the life of their dreams. He is also a pastor, an award-winning author, and a recovering attorney! He makes his home in England with his wife and their two delightful daughters.
Disclosure of Material Connection
Some of the links in the post above are “affiliate links.” This means if you click on the link and purchase the item, I will receive an affiliate commission, but you don’t pay any more. Regardless, I only recommend products or services I use personally and believe will add value to my readers. I am disclosing this in accordance with the Federal Trade Commission’s 16 CFR, Part 255: “Guides Concerning the Use of Endorsements and Testimonials in Advertising.”


